- Forest View Elementary School
- K-2 Art projects
Platteborze, Sarah
Page Navigation
-
Week Two
Dürer Pattern Rhino

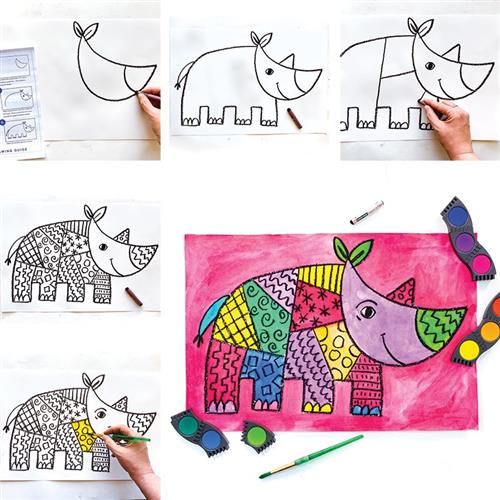
This strong, brightly-colored rhinoceros is a great lesson to use what we already know about the elements of LINES AND SHAPES in art. We will follow a directed line drawing and then use lines and shapes to create patterns. For this lesson we will use a black oil pastel which will give a lot of contrast with the bright liquid watercolors. We know your art will be a stunning piece to display around the house.
Today I will learn about repeating LINE and SHAPE so that I CAN create PATTERNS inside my rhino’s body and horns.
Supplies:
12x18 white paper (use whatever white paper you have)
Black oil pastel (black crayon works too)
Liquid Watercolors
Medium size paintbrush
This project is suggest to be completed in 2 sessions @ 35 minutes each.
Helpful Hint: If you don’t have access to watercolors you can still do this project. After you do your lines and patterns use washable Crayola markers to color and then using water brush over the colors to create the look of watercolor.
ABOUT DURER’S RHINOCEROS

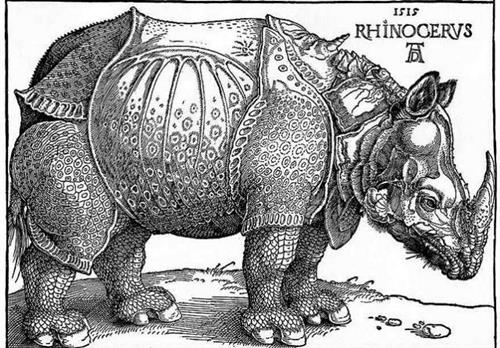
Albrecht Dürer was a German painter and printmaker during the Renaissance. Dürer made his rhino woodcut based on a written description and loose sketch by another artist because he had never seen a rhino in real life before. In fact, most Europeans at that time had no idea what a rhinoceros looked like because they were not native to their area and only a few specimens had been brought from India to Europe. Dürer’s rhino depiction became the only rhino that many people would ever see.
Day 1: Drawing the Rhino
Step One:
Get your supplies ready. Then watch this instructional video on how to draw your Durer’s Rhino.
Step Two:
Using this drawing guide to draw the rhino with a black oil pastel on your white paper.
PATTERN IDEAS:
- Lines (horizontal, vertical & diagonal) • Zig-zag lines
- Swirls
- Bumpy lines
- Circles
- Squares
- Castle lines
- Stars
Challenge yourself to not repeat any patterns twice. Add patterns to the horns of the rhino, too!
Day 2: Painting the Rhino
Step One:
Use liquid watercolors and a medium round paintbrush to paint each section of the rhino. Take your time and carefully fill in each area.
Don't forget to paint the toes and the tail!
Step Two:
Paint the background one color so that the rhino stands out. This is called CONTRAST.
When you have finished your Rhino have your parents email a picture to your art teacher. Either Mrs. Russell at arussell@everettsd.org or Mrs. Platteborze at splatteborze@everettsd.org
We would LOVE to give you some feedback and share your art on our Webpage Art Showcase

